Showing posts with label Episode 3. Show all posts

Monday, October 11, 2010

Shaak Ti

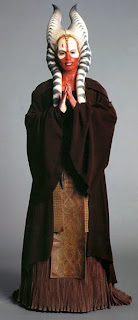
I also recently finished a commission for the soft parts of the Shaak Ti costume. I created: the skirt, shirt, tabbards, and outer cloak.

Here is a promotional image of Shaak Ti, she can be seen in Episode 2: Attack of the Clones and Episode 3: Revenge of the Sith.


Here is my version:


Saturday, April 10, 2010

Senate Guard Progress!

I started sewing my husband's Senate Guard robes today (he wasn't feeling well, so I thought this might help cheer him up). I got the velvet and lining for the robe cut out and the velvet outer portion of the robe sewn together. Here are a couple of pictures, I would have taken more, but the process was so quick, I didn't even think about it.


Using the velvet of the robe as a "pattern" for the lining of the robe:


My husband modeling the velvet portion of the robe after I had it sewn together:

Thursday, April 8, 2010

Senate Guard Helmet

After more than two years of wanting this costume, we finally took some of the tax return money and purchased a Senate Guard helmet for my husband. It came a couple days ago. It will require some work, we got a "raw" helmet because it was about $100 cheaper. This way too, we can choose the color of paint to match the robes more closely. The "spine" is rather crooked, so we'll have to fix it, or create something new. The "lens" is just wrong, it should be black and a more rigid plastic, like sunglasses lenses.


The Helmet:


Front


3/4 Front


Left Side


Back


Right Side


Top


Inside


Spine side


Spine Back


Spine Front


"Lens"

Monday, August 10, 2009

Owen & Beru Lars and Luke Skywalker

Here are pictures of the completed Episode 3 Owen & Beru Lars with Baby Luke pictures:


Wednesday, May 13, 2009

Padme Mustafar Update

I have my Star Wars Episode 3: Revenge of the Sith (ROTS) Padme "Mustafar" costume completed now and it has Rebel Legion approval (as formal/canon). Here are some "in progress" pictures and some completed costume pictures:


The finished sleevelets.
These were much easier for me to do since I had already done the sleevelets for my aqua georgette gown and spent a LONG time getting the size just right for my arms when I made them. This time, I was able to use my aqua georgette sleevelets as a template!


Left sleevelet embroidery detail.
This is Padme's signature "Naboo Symbol" seen (in some form or other) on most of her gowns throughout the prequel trilogy. I drew the symbol onto the back of the faux suede and hand-embroidered it using DMC thread.


The "buckle" and broach made from white Primo clay
(after baking, prior to painting).
I used exhibit photos gathered from the Internet (most likely from Padawan's Guide or Kay_Dee's excellent FIDM exhibit gallery) as my template. I printed the image to a size that seemed to be the proper scale (body:buckle ratio)(body:broach ratio), cut them out, placed the cutouts on top of the prepared clay and used a pin to punch through the paper and transfer the design onto the clay (incidentally, this is also how Michelangelo and his assistants transferred the designs onto the Sistine Chapel ceiling...). After I had the basic shape cut out, I began to sculpt it to resemble the actual pieces. I added flowers and stems that I sculpted separately. I also sculpted the triangular details separately and added them to the buckle/broach, along with the flowers & stems, before baking.

Here are the buckle and broach after I painted and "weathered" them.


The harness front, with buckle in place.


The harness back after sewing Velcro on to keep it closed and allow for easy removal.


The entire finished costume (minus sleevelets).


Front


3/4 Front


Left side


Back


Right side

I'm not entirely happy with the wig. It looks too fake in the front at the part line. I'm contemplating adding a braid extension to my own hair now that I found a place that sells extensions that match my hair color.

To see my previous update click here.
Sunday, March 22, 2009

Padme Aqua Georgette Update

I am so very close to being finished with my Padme aqua georgette gown that I was able to wear it for the first time last night (3-21-09) at an event! My city's hockey team has a Star Wars night every year, and we (the Midwest Base of the Rebel Legion & Great Lakes Garrisson of the 501st Legion) help raise money for the Grand Rapids Griffin's youth foundation. So, my aqua georgette gown made it's debut at the Grand Rapids Griffin's Star Wars night.

I had some pictures taken in front of the photo booth green screen when there was a lull in activity:


I still have a bit of embroidery to do on the front, near the hem of the gown, as well as the back drape.

To see my previous update click HERE

Wednesday, March 11, 2009

Padme Mustafar Update

I decided to go ahead and start working on my Mustafar outfit even though I am not 100% finished with my aqua georgette gown yet. The work I need to do on the aqua georgette is evening, sitting on the couch, after the kids are in bed work and the things I can do on the Mustafar outfit can be done while the kids are up.

So, last week I began laying out the pattern for the top and creating a mock-up to test for fit. After a bit of altering, I finally had the pattern ready. I have the top 100% complete now with the exception of sewing snaps onto the neckline and collar to attach the collar. The movie-used costume has an invisible zipper up the back and a removable collar held in place with magnets (of all things!). I didn't want to spend the money on magnets, so I'll be using large snaps.

Here are some progress pictures:


Front, no collar.


Back, no collar.


Front, with collar.


3/4 front with collar.


Close up of front.


Front seam detail.

Back seam detail.


Closeup of front with collar.

To see my previous posting on this costume, click Here.

Padme Aqua Georgette Gown Update

Here's another update on my Padme Aqua Georgette Gown. I haven't done any more embroidery on the gown itself, though I did attach hooks & eyes to the back of the gown and the drape so that the back drape could be worn on the gown (regardless of the fact I haven't embroidered anything on the drape yet). I have been focusing most of my attention on the sleeves (gauntlets). I also have the headband finished!

Below are several progress pictures.


After the embroidery was finished on the sleeves, I started adding the shells and beads.


Closeup of the embroidery on the sleeves.


Adding the shells and beads to the top of the sleeves. (Flash off)


Adding shells and beads to the tops of the sleeves. (Flash on)


Sleeve detail showing the "V" shaped inset. I included an opening, since I believe the original may have had some sort of opening here to allow for easier dressing.


Sleeve detail showing "V" inset.


Headband after painting.


Headband after painting.


Headband complete.


Headband complete.


Gown front, with drape attached.


Gown side, with drape attached.


Gown side, drape attached.


To see my previous update click Here